
How the Bass is Made and How the Bass Register Vibrates
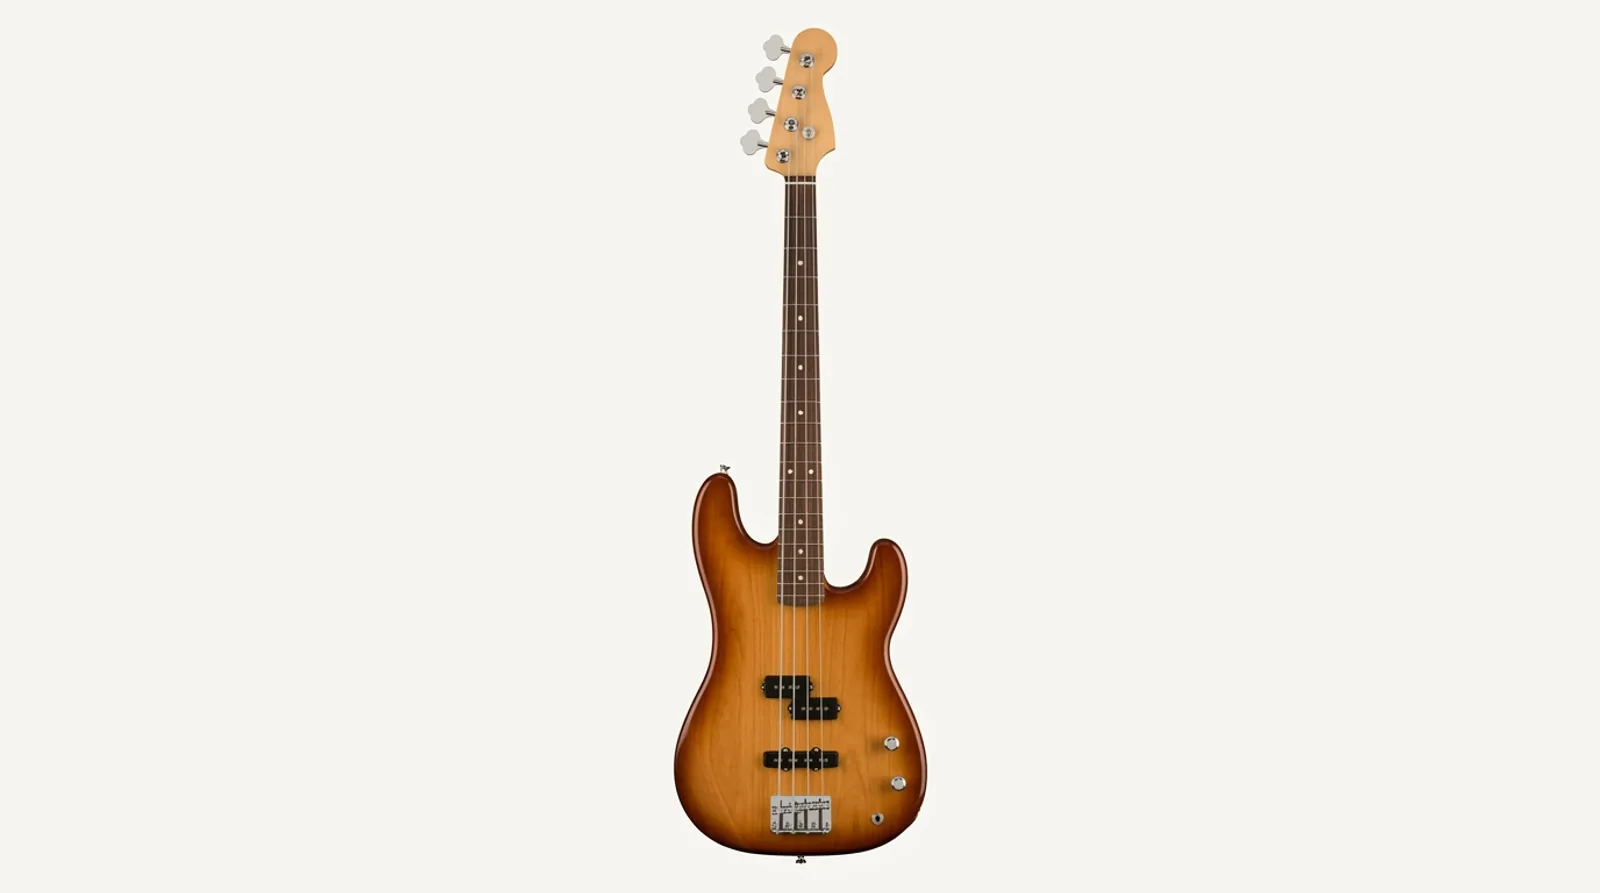
The electric bass is a string instrument with a solid wooden body.
Its long 34-inch scale, which is 864 millimeters, keeps the strings at just the right tension.
The four strings withstand over 70 kilograms of total force between the nut and the bridge.
Pickups and Signal
Underneath the strings are magnetic pickups with magnets and copper wire coils.
- Split-coil pickups cancel electrical hum.
- Single-coil pickups deliver a clear and defined sound.
- Humbuckers combine two coils. They sound thicker and also cancel noise.
- The passive tone control cuts high frequencies for a rounder tone.
Dense alder, ash, or mahogany wood in the body and maple in the neck sustain long notes without annoying feedback.
The electric bass produces bass notes between 40 Hz and 200 Hz.
Tuning in Perfect Fourths and the Bass Clef
The four bass strings are tuned in ascending perfect fourths. They are counted from thickest to thinnest.
You can hear the tuning notes on the bass homepage. In chord notation, they are written E1, A1, D2, and G2.
The Four Strings in Hertz
With the tuning fork at 440 Hz, the open strings vibrate at these frequencies.
- Fourth string, E1, 41.20 Hz.
- Third string, A1, 55.00 Hz.
- Second string, D2, 73.42 Hz.
- First string, G2, 98.00 Hz.
The note E1 produces an airwave 8.3 meters long.
Roundwound strings deliver brightness with lively harmonics, and flatwound strings give a dry sound typical of soul music.
How it's Written in Sheet Music
The bass is read in bass clef on the fourth line. To avoid ledger lines, it sounds an octave lower than what you read.
C2 vibrates at 65.41 Hz and is fretted on the 3rd fret of the A string.
What interval separates adjacent strings on a standard electric bass?
How to Read Note and Arpeggio Diagrams
A bass diagram shows the four strings vertically with E1, A1, D2, and G2 from left to right.
- Horizontal lines mark the metal frets.
- The thick bar at the top is the nut.
- A number next to it indicates which fret the shape starts on if you move towards the body.
What the Numbers on the Bass Mean
In CifraLab's charts, the number inside the dot marks the order of the chord notes.
- 1 marks the root or tonic.
- 2 marks the third.
- 3 marks the fifth.
- 4 marks the seventh.
Play the notes one after another in an articulated way. You don't need to fret them all at the same time as on a guitar.
The arpeggio shows which notes form the chord along the fretboard.
How to Hold the Bass and Take Care of Your Back
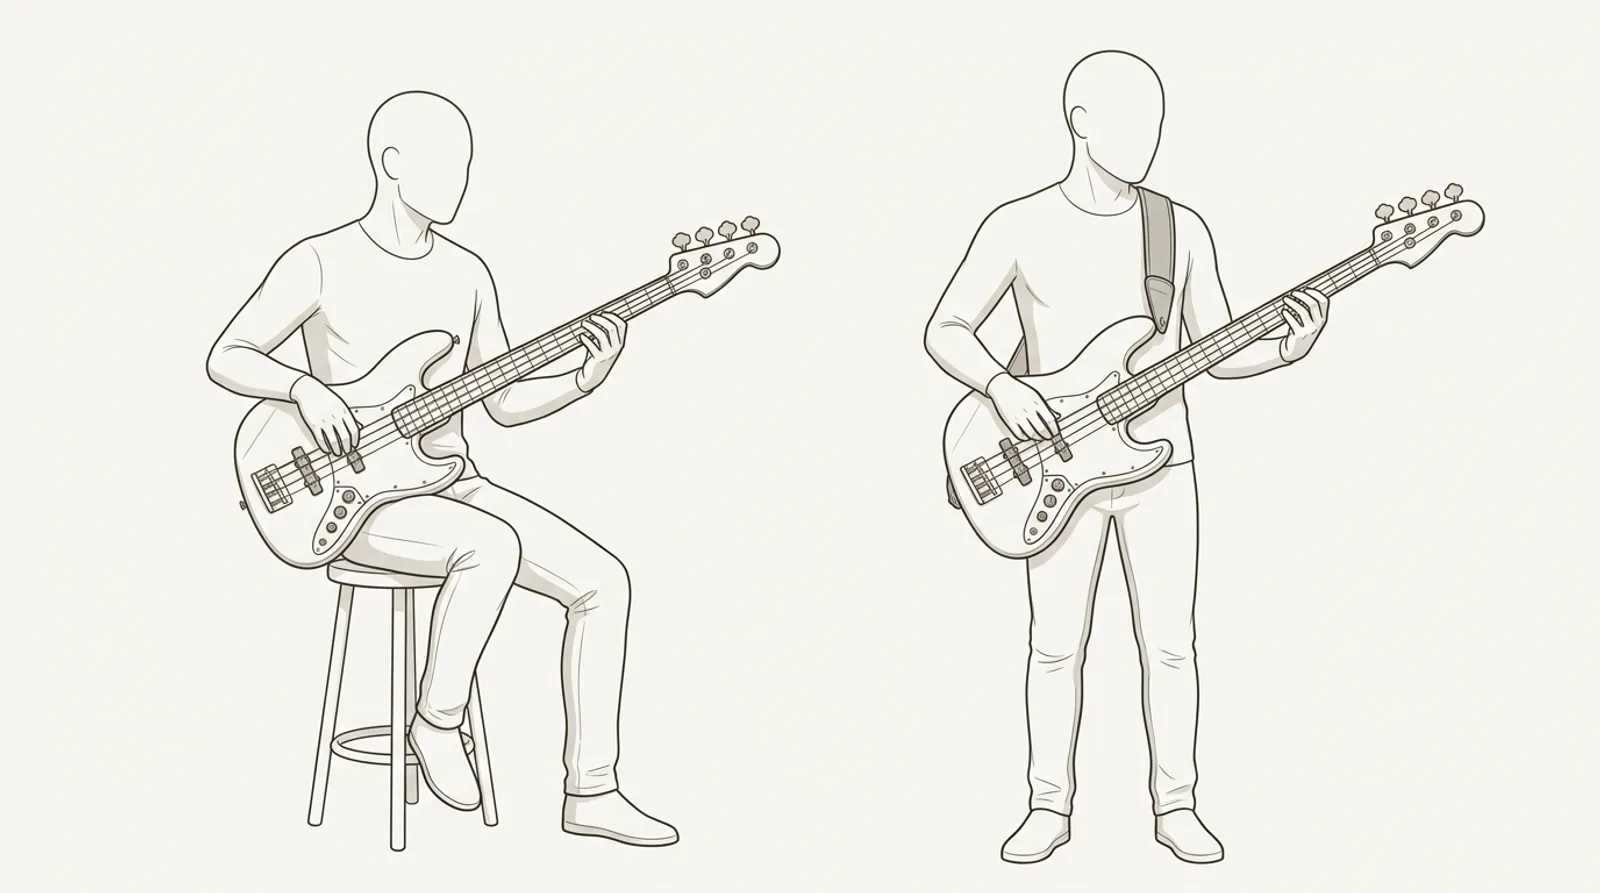
An electric bass weighs between 3.6 and 4.8 kilograms. To play without pain, you need good support.
The Strap and the Neck
- Use a wide, padded strap 7 to 9 centimeters wide to distribute the weight on your back.
- Adjust the height so the bass is in the same position whether you're sitting or standing.
- Tilt the neck upwards at about 45 degrees so your left arm rests comfortably.
- Keep your wrist straight without bending it forward or backward.
When playing seated, rest the instrument on your leg without hunching your spine.
Playing relaxed protects your joints and prevents shoulder discomfort.
The Right Hand: Alternating Fingers and Rest Stroke Technique
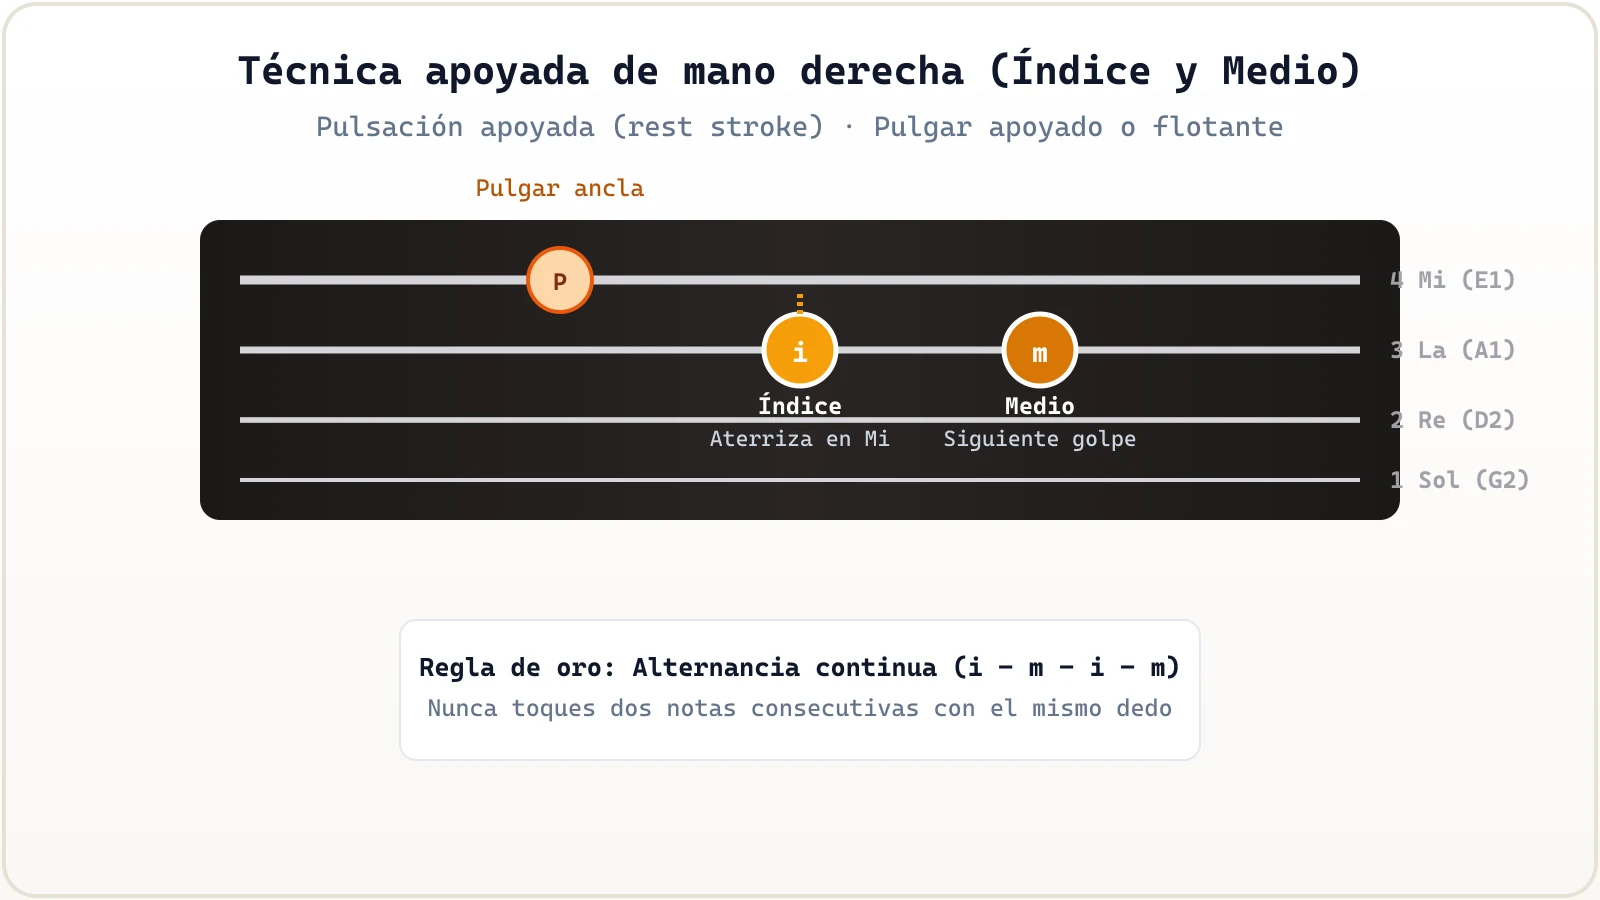
The right hand produces sound by plucking with the fingertips.
Rest Stroke
The index or middle finger plucks the string and immediately rests on the adjacent upper string.
This touch dampens unwanted vibrations and gives you a clear physical reference.
The Floating Thumb
Rest your thumb on the pickup when playing the bass strings.
When moving to the D and G strings, move your thumb to the E or A string to mute them silently.
Always alternate index and middle fingers with even volume on each note.
The Left Hand and Simandl Technique
Try it on your bass
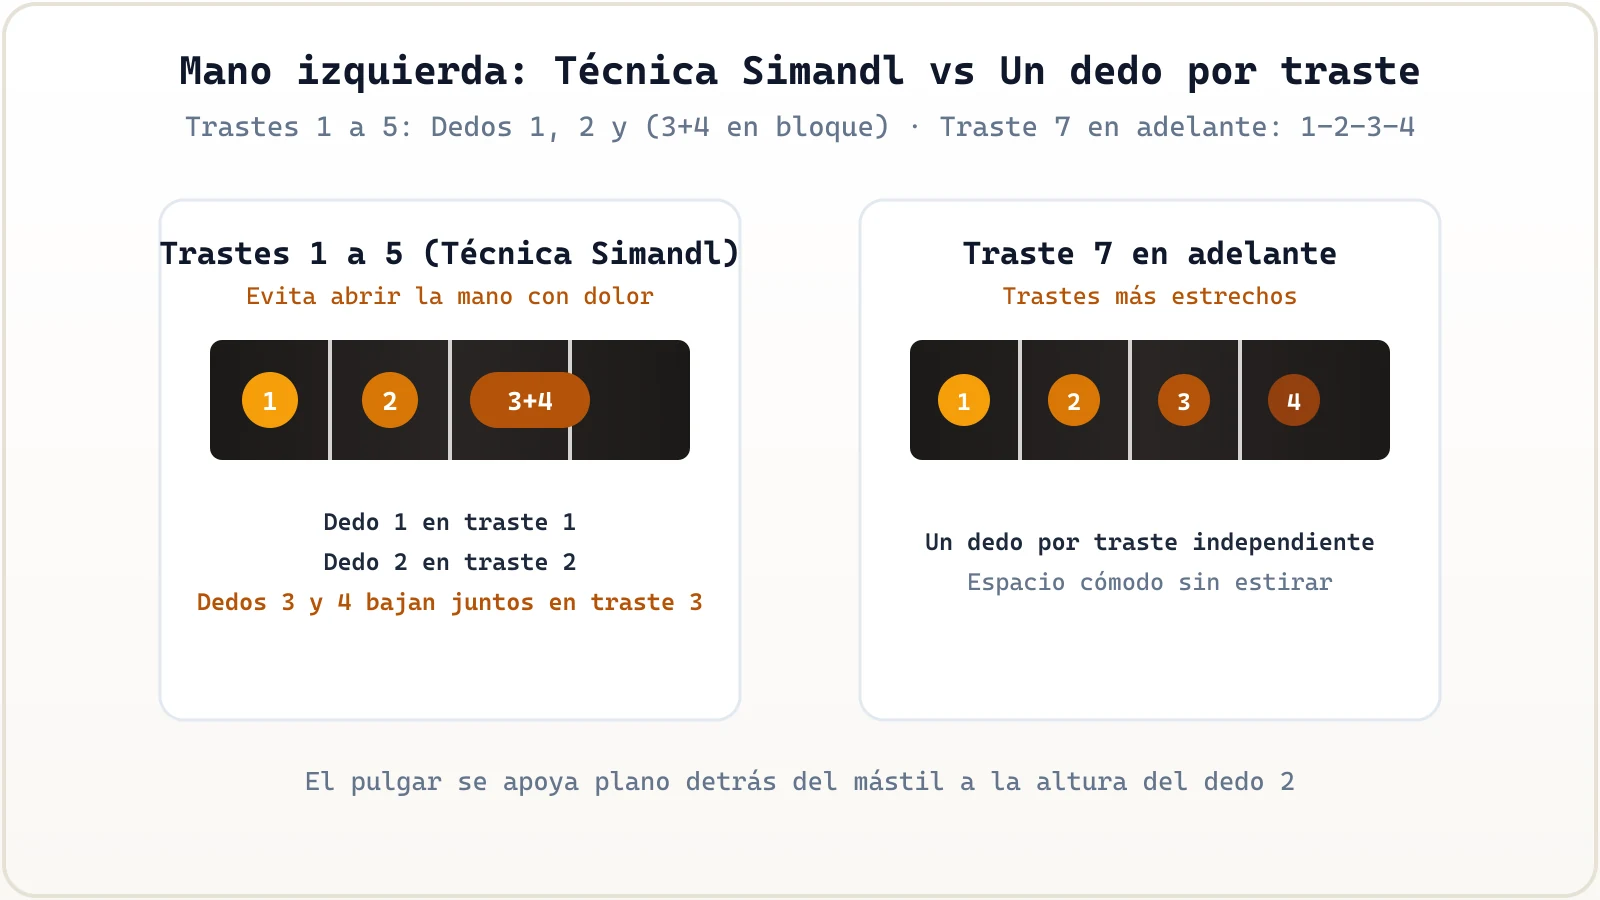
In the first three frets, use the classic Simandl method: finger 1 for fret 1, finger 2 for fret 2, and lock fingers 3 and 4 together as a unit for fret 3. This avoids tendon strain in low neck positions.
In the first five frets, the distance between metal bars exceeds three centimeters.
Trying to use one finger per fret in that area quickly tires the hand.
Simandl's Finger Assignment
- Finger 1, which is the index finger, covers the first fret.
- Finger 2, which is the middle finger, covers the second fret.
- Fingers 3 and 4, ring and little finger, go down together as a single block for the third fret.
From fret 7 onwards, the frets are closer together, and you can use one finger per fret.
Place your thumb behind the neck opposite your middle finger without squeezing.
Muting Notes and Controlling Silence
On the electric bass, knowing when to silence a string is as important as making it sound.
A note has three moments: the initial attack, the time it vibrates, and the cut to silence.
How to Mute with Both Hands
- With your left hand, loosen the finger pressure on the fret without lifting the fingertip from the string.
- With your right hand, gently rest your palm or free fingers on the strings you are not playing.
If you leave open strings, they vibrate sympathetically and muddy the mix.
Cut each note precisely at the instant the next one begins.
The Bassist's Role Alongside the Drums
The bassist and drummer form the rhythmic foundation of the band.
Your ear should connect with the bass drum pedal.
The Pulse and Subdivision
Match your tonic note with the bass drum hit so they sound like a single, powerful impact.
Subdivide the measure by counting eighth notes and sixteenth notes in your head to avoid rushing.
Playing in the center of the pulse makes the music move with solidity.
Bass Lines with Root and Fifth
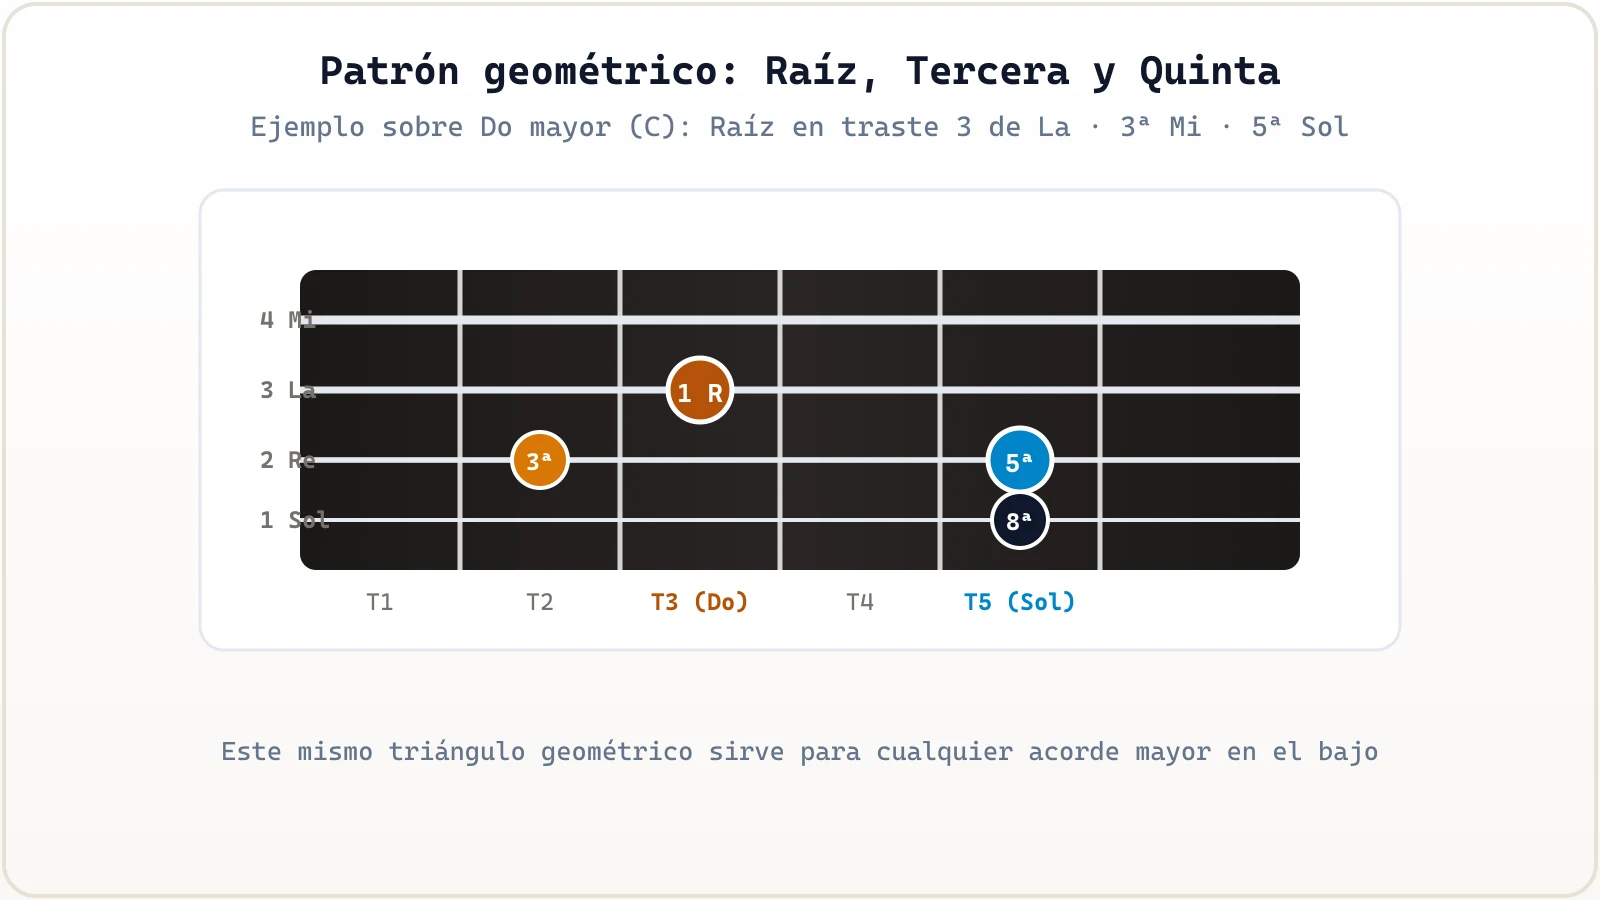
A good bass line doesn't need many fast notes.
The most common formula in pop, rock, cumbia, and ballads combines the root and its perfect fifth.
The Shape of the Fifth
If you play C on the 3rd fret of the A string, its fifth G is two frets higher on the D string.
The root falls on beat 1, and the fifth responds on beat 3.
In C major, you can add the third E on the 2nd fret of D to define whether the chord is major or minor.
The root grounds the chord, and the fifth gives it movement.
Sevenths and Chromatic Passing Notes
To add variety to your lines, you can include passing notes to the next measure.
Minor Seventh and Major Seventh
- The minor seventh gives the characteristic color of blues, funk, and rock and roll.
- The major seventh, written as Maj7 in chord notation, provides the elegant feel of bossa nova.
Chromatic Approach
Play a note one fret before the note you want to reach.
If you're going to D minor, playing C sharp on the last eighth note of the previous measure resolves naturally.
A chromatic passing note creates tension before landing on the tonic.
Open Triads and Tenth Intervals
Playing two notes together below 100 Hz sounds dark and muddy due to clashing harmonics.
If you want to accompany with two-note chords, move up to the higher frets.
The Interval of a Tenth
A tenth is a third played an octave higher.
You fret the root on the E or A string and play the tenth on the G string, for example, over F.
Tenths in the higher register sound clean and full of warmth.
Troubleshooting Noise, Buzzes, and Cut Notes
If a string buzzes against the metal fret, first check where you are fretting.
Fretting in the Right Place
- Fret just behind the fret bar, not in the middle of the wooden space.
- Pluck with just enough force. Pressing too hard tenses the hand and sharpens the note.
- If notes sound cut off, hold your left finger down until your right hand attacks the next note.
If the neck is out of adjustment, the internal steel truss rod needs calibration by a luthier.
Playing with relaxed fingertips eliminates noise and extends the duration of each note.
How to Study with the Metronome on the Off-Beat
The metronome is your best ally for gaining rhythmic precision.
The Click on Beats 2 and 4
Start at 60 BPM and go up to 80 BPM. Instead of having the click on every beat, make it sound only on beats 2 and 4 of a 4/4 measure.
This way, the metronome imitates the snare drum, and you mark beats 1 and 3.
In this chapter 13, you complete your daily method. Record your 15-minute sessions with your phone and listen with headphones to see if your pulse remains steady.
Practicing slowly gives you the control needed to play confidently with other musicians.
References for checking technique
Editorial text by CifraLab. These sources help check tuning, reading and technique. Diagrams are study guides and do not replace instrument setup or a posture assessment.